A learning exercise for for facial rigging. Scripted in Mel and Python
Sunday, 19 October 2014

Friday, 19 September 2014
Bipedal Auto-Rig and Animation Tests
A learning Exercise for scripting a Bipedal Auto-Rig with Mel and Python. Animation tests of the rig:
Friday, 26 July 2013


Sunday, 14 April 2013
Funnel Web Spider - WIP


Wednesday, 13 February 2013
Forest Environment - Maya, Paint Effects, Mental Ray, After Effects
After watching some wonderful tutorials by Alex Alvarez on creating plants in Maya's paint effects and rendering them in mental ray I figured I'd have some fun and create some of the plants I see in Sydney when bush walking. These Paint Effects plants have been converted to Polys and have been instanced along a poly plane.
I plan to keep growing a library of plants and trees so I can quickly make environments and animate them.
Here are two useful scripts....
1. The SpPaint Script
2. The Leaf UV Tool
Software Used - Maya, Mental Ray and After Effects.


Tests:


Sunday, 2 September 2012
Outhouse - SHOWFEST 2012
Outhouse won Best Film for 2012 at SHOWFEST
Me and Jack Verace (Young Toilet paper Roll)

Me and Robin Queree (Old Toilet paper Roll)

Gees... I kinda look like I was photographed once and photo-shopped in don't I? :)
Me and Jack Verace (Young Toilet paper Roll)

Me and Robin Queree (Old Toilet paper Roll)

Gees... I kinda look like I was photographed once and photo-shopped in don't I? :)
Wednesday, 11 July 2012
Bipedal Auto-Rig - WIP
I still have some changes/fixes to make and some additions to add before I start animating a few characters.
I have been working on a facial rig as well but that's a little ways off....
Sunday, 6 May 2012
Friday, 6 April 2012
Wednesday, 21 March 2012
Learning Mel - Early Days
I love how using Mel saves me countless hours. When I think of all that time I could have saved in the past before I knew how to do this :)
For example – setting up an Ik Fk blend for rotation and scale is a easy as...
string $ArmNm[] = {"shld01", "elbA01", "elbB01"};
for ($jntSw=1; $jntSw<4; $jntSw++)
{
{
orientConstraint
-n ($prefix + "_" + $partName + "_" + ($ArmNm[($jntSw-1)]) + "_jntOri")
-n ($prefix + "_" + $partName + "_" + ($ArmNm[($jntSw-1)]) + "_jntOri")
($prefix + "_" + $partName + "_" + ($ArmNm[($jntSw-1)]) + "_ik")
($prefix + "_" + $partName + "_" + ($ArmNm[($jntSw-1)]) + "_fk")
($prefix + "_" + $partName + "_" + ($ArmNm[($jntSw-1)]) + "_jntBnd");
createNode blendColors
-n ($prefix + "_" + $partName + "_" + ($ArmNm[($jntSw-1)]) + "_jSBld");
-n ($prefix + "_" + $partName + "_" + ($ArmNm[($jntSw-1)]) + "_jSBld");
connectAttr
($prefix + "_" + $partName + "_" + ($ArmNm[($jntSw-1)]) + "_ik.scaleX")
($prefix + "_" + $partName + "_" + ($ArmNm[($jntSw-1)]) + "_ik.scaleX")
($prefix + "_" + $partName + "_" + ($ArmNm[($jntSw-1)]) + "_jSBld.color1R");
connectAttr
($prefix + "_" + $partName + "_" + ($ArmNm[($jntSw-1)]) + "_fk.scaleX")
($prefix + "_" + $partName + "_" + ($ArmNm[($jntSw-1)]) + "_fk.scaleX")
($prefix + "_" + $partName + "_" + ($ArmNm[($jntSw-1)]) + "_jSBld.color2R");
connectAttr
($prefix + "_" + $partName + "_" + ($ArmNm[($jntSw-1)]) + "_jSBld.outputR")
($prefix + "_" + $partName + "_" + ($ArmNm[($jntSw-1)]) + "_jSBld.outputR")
($prefix + "_" + $partName + "_" + ($ArmNm[($jntSw-1)]) + "_jntBnd.scaleX");
}
In the example above I've given procedure arguments for $prefix (character Name), $partName (body part like "arm") and I've used the string array ($ArmNm[]) to capture the elements within $partName - in this case the shoulder joint and the two elbow joints.
A `for loop` cycles through 3 times (<4) and matches the $armNm array containing the elements within the $partName, (-1 because arrays start with 0 in Mel), to the newly created blend nodes for scale blending and orient constraints for rotational blending. These are then connected to the bind joints.
A `for loop` cycles through 3 times (<4) and matches the $armNm array containing the elements within the $partName, (-1 because arrays start with 0 in Mel), to the newly created blend nodes for scale blending and orient constraints for rotational blending. These are then connected to the bind joints.
Thursday, 1 March 2012
Stretchy Ribbon Spine
Here is a test of a Mel script I wrote for a Stretchy Ribbon Spine. I created two buttons for it. The first one creates a system of locator's which can be moved to line up with the characters spine and the next creates the spine itself based on the orientation and positional information of the locators and zeros the rotational values on the joints.
I've still got allot to learn about organizing my scripts properly and have been reading everything I can get my hands on regarding the best methods/standard procedures..... but gees it's fun.
Tuesday, 28 February 2012
Learning Notes - Python and Mel
I've played with Mel, (Maya embeded language), on and off over the years but, to be honest, I never dug deeply into it. I can't figure out why - would have made life so much easier. I'm thoroughly enjoying the process of learning Mel and python at the moment. It's so very addictive.... and helpful :)
Here is a few of the basics in mel...
Data types
Integers
int $areWholeNumbers = `##`
Floats
float $areFractions = `##`
Vectors
vector $areX,Y,ZPositions = <<X,Y,Z>>
Array
$##[starts at 0]
Conditional Statements for mel
<: - less then, >: - greater then, == - equal to: != - not equal to, >= - greater or equal to: <= - less or equal to ?: -if else && -logical and || -logical or +,- -plus,minus ^ -vector cross product / -divide * -multiply % -modulo ++, -- -increment,decrement by 1 ! -not
Loops/Iterantion in Mel
While-Loops
example;
int $x =0;
while ($x <10)
{
$x =$x+1;
print ($x + "\n");
print ($x + "\n");
}
For-Loops (loop start) (loop end) (increment)
example;
for ($t=0; $t<6; $t=$t+1)
{
joint -name ("naths_" + "_jnt");
}
For-In-Loops
example
select bob;
string $bobsInHere[] =`ls -sl`;
for ($allBobsAtributes in $bobsInHere)
{
string $bobsAtributes[] = `listAttr -write $allBobsAtributes`;
for ($bobsWritable in $bobsAtributes)
{
print ($bobsWritable + " is a writable attribute of bobs" +"\n");
}
}
Do-While Loop
int $t = 1;
do
{
$t += 3;
print ($t + "\n");
}
while ($t <= 10);
Do-While Loop
int $t = 1;
do
{
$t += 3;
print ($t + "\n");
}
while ($t <= 10);
Special Characters of note
\ =escape,
\n = newline,
/t = tab,
\r = carriage return
Procedures
An example is a global procedure. The procedure is called from memory with the bottom line and arguments are given for width, height, depth and name.
Example;
global proc nathansCubeIT (float $width, float $height, float $depth, string $name)
{
polyCube -width $width -height $height -depth $depth -name $name;
}
nathansCubeIT 5 6 4 nathCube;
Thursday, 23 February 2012
Stretchy Ribbon Spine

I've been experimenting with different ways to deform and animate my "Secret Life of Objects" characters.
They all twist, stretch and squash....
Previously I used a stretchy spline Ik. This is a really simple technique which involves joints being spread evenly along, and constrained to, a curve. The curves length, (when it’s stretched) is divided by its initial length and the result is input into the joints scale so that the length of the joint chain matches that of the curve. Unfortunately joints are straight and the curve is… well… curved so the last joint on the chain sometimes overshoots the curve length. Rotate values are passed evenly between the top and bottom controls with an up vector object.
A slightly old but great set of tuts by Aaron Holly uses a “ribbon spine” instead.
Instead of a curve Aaron uses a nurbs surface and parents the bind Joints under follicles created on that surface. The surface is then bound just like the stretchy spline with joints for animation and aim vectors are used to constrain the direction the joints point. Rotational values are output from top and bottom controllers as a percentage relative to the joints position which is then averaged and fed into the joints to evenly distribute them. The center joint, for example, receives 50/50 from top/bottom.
Instead of a curve Aaron uses a nurbs surface and parents the bind Joints under follicles created on that surface. The surface is then bound just like the stretchy spline with joints for animation and aim vectors are used to constrain the direction the joints point. Rotational values are output from top and bottom controllers as a percentage relative to the joints position which is then averaged and fed into the joints to evenly distribute them. The center joint, for example, receives 50/50 from top/bottom.
The benefit is that you can turn/rotate your character as many times as you want and the scale of the joints won’t overshoot – nice. Here is a little test I did with ten joints and three mid-section controllers. They don’t quite rotate the way I want but it will eventually... I also want to create a script for my S.L.O.O rig once I figure out how to get the animation features I want/need - a good excuse to learn mel.
Wednesday, 8 February 2012
Lip Sync Test
I recently had a read of Jason Osipa’s book "Stop Staring" and what a great book it is. I can instantly see the potential in Osipa's way of thinking regarding Visimes Vs Phenetics. Time to go back to basics and learn to do this properly. This is a quick test so it's a little average but it's very quick.
I never knew my voice could sound like that :)
One thing I should make note of for myself comes in the form of the McGurk effect which shows us that the visual shape of a sound can over ride the sound itself - for example "B" can become "F". HERE is the link to a BBC documentary about it. This is one of the reasons that visuals shapes have to look right or the viewer might be confused.
Saturday, 4 February 2012
Sticky Lips in Maya

Just playing around with this Maya pluggin for sticky lips...
Video:
Might take some playing but kinda cool and useful for lots of stuff :)
Wednesday, 1 February 2012
WIP - Facial Rigging - Primary Facial Expressions
I rigged this head with a little UI in Maya and incorporated the primary expressions of Contempt, Fear, Anger, Disgust, Happiness, Sadness and surprise. I don't think it would really work for animation but it's fun to play with...
P.S. You can take the Paul Ekman Micro Expression sample test HERE to see if you can instinctively pick up on other peoples emotions/feelings. Strangely the only one I ever miss is anger but I usually get it right because it's the only one I'm ever unsure about.
Thursday, 19 January 2012
nCloth on a Dragon Wing - Rigging in Maya
1. Smooth bound the wing to the wing joints
2. Separated the parts of the wing that I wanted to apply ncloth to.
3. After Ncloth was created from the separated wing objects I recombined the wing objects before I merged vertices with a threshold of 0.01
4. Cleaned up the mesh history and deleted unwanted nodes in hypergraph.
Might be a better way to do this… some R&D needed.
I've started adding some textures in maya and am enjoying making him look like an Australian bearded dragon. Rigging him will be fun as will be adding details in Zbrush...

Friday, 13 January 2012
Modeling practice - Audi - W.I.P
Still lots of things to fix like the lights and some modelling issues but here is a test render - modeled in Max and rendered in Vray.

Tuesday, 10 January 2012
Wednesday, 28 December 2011
Modeling a car in 3D Studio Max
This started as a model of an Audi TT but after I Googled "Audi" I decided to go for an Audi A6 - I like the shape of its front for some reason. It's still a bit choppy around the front area but it'll get there with a little tweaking.

Thursday, 22 December 2011
Modeling practice session in 3D Studio Max - Car

Tuesday, 29 November 2011


Thursday, 17 November 2011
Motor Scooter Render - Vray - WIP

Gamma correction applied to bitmap textures and in the Vray render settings. I need to think of a better background... hmmm
Sunday, 6 November 2011
W.I.P - Modeling A Scooter
Scooter modeled from a photo I took of one that I thought looked kinda cute.
Here is the modeling session.
Here is the modeling session.
Vray render of a scooter I modeled... W.I.P


Friday, 14 October 2011
Vray - Back to the basics
I decided to go back to rendering basics with Vray for 3DS Max before diving into some more complex rendering.
2. Indirect light (no secondary bounces)
3. Indirect light (with secondary bounces)

2. Fog bias 0.0
3. Fog bias -80.0
4. Fog bias 80
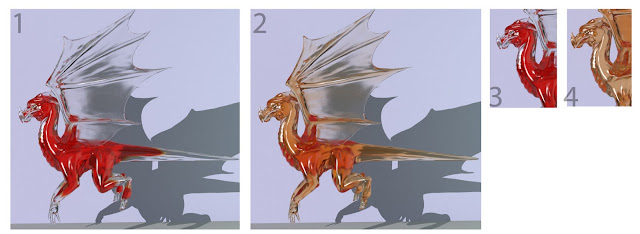
Fog is a refractive parameter and describes light absorption/object thickness. When fog bias is set below 0 thick areas become darkened.
2. Hard wax translucency

Translucency is subsurface scattering type effect
IOR Examples -
1. Diamond - 2.418
2. Milk - 1.350

1. Blend material with checker transparency mask
2. Dirt map added to mask based on occlusion
3. Cellular procedural added to radius of dirt map to approximate areas where dirt would form based on ambient occlusion
 Dirt maps can be added to existing materilas using the vray blend material. Because it is based on occlusion it is size dependent.
1. Dirtmap where something like rust would be
2. Dirtmap with a bias on the negative Y to approximate where rust would form underneath an object or pilon that interects the wall.
3. - Normals inverted = dirt appearson outer edges of object.
4. Normals not inverted = dirt appears on inner edges.
5. Blend material can blend the two together.

I created a Sphere with noise displacement + directional light with caustics turned on to create a caustics effect on the floor.

Global Illumination
1. Direct light2. Indirect light (no secondary bounces)
3. Indirect light (with secondary bounces)

In Vray - Four main ways to calculate GI
1 - Brute Force - (good for primary bounce if scene is detailed)
2 - light cache - (traces paths from the camera into the scene - opposite of photon mapping - fast and good for secondary bounces - good for interior scenes - speed vs quality)
3 - Photon Mapping (old method - slow but accurate - still good for caustics)
4 - Irradiance map (adaptive- can cause flickering - min/max - stores objects irradiance)
Fog (refractive parameter)
1. Fog bias -10.02. Fog bias 0.0
3. Fog bias -80.0
4. Fog bias 80


Fog is a refractive parameter and describes light absorption/object thickness. When fog bias is set below 0 thick areas become darkened.
Translucency
1. Soft water translucency2. Hard wax translucency

Can convert all material (for example; from Maya FBX import) to Vray materials
Right click in material view port and select vray scene converter - select yes
I.O. - Index of Refraction
IOR Examples -
1. Diamond - 2.418
2. Milk - 1.350


Vray dirtmap
1. Blend material with checker transparency mask
2. Dirt map added to mask based on occlusion
3. Cellular procedural added to radius of dirt map to approximate areas where dirt would form based on ambient occlusion
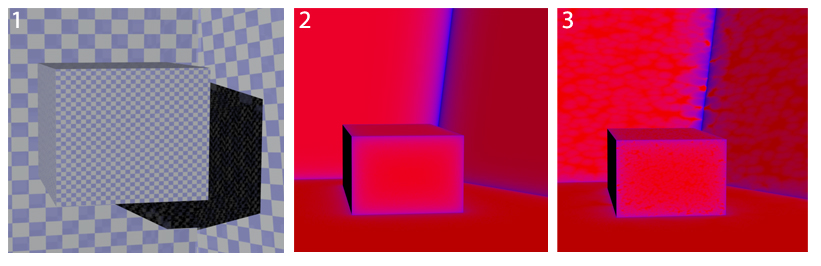

1. Dirtmap where something like rust would be
2. Dirtmap with a bias on the negative Y to approximate where rust would form underneath an object or pilon that interects the wall.
3. - Normals inverted = dirt appearson outer edges of object.
4. Normals not inverted = dirt appears on inner edges.
5. Blend material can blend the two together.

I created a Sphere with noise displacement + directional light with caustics turned on to create a caustics effect on the floor.

Wednesday, 12 October 2011
Speed modeling a room in Maya
I'm currently playing with Vray in max and rendering this scene. Thought I would start in Maya


A quick render with some shaders applied -

...and another quick modeling/textureing test using Aman New Deli as a spring board - I used a Vray skylight, some portal lights and tossed in an HDRI image into the environment slot to see how it would look - also quickly added some depth of field in post;

Tuesday, 20 September 2011
Video copilot - AE Particles & Origami Pigasus
Thought I would follow along with a cool particle tutorial by Andrew Kramer on videocopilot.net.
I'll have to think up some cool ideas to see how far I can push these techniques.
A ghostly Origami Pigasus animation i did years ago for fun and very quickly - (my excuse for not motion tracking it properly) - I wouldn't mind finding the original maya files and making it look good - - with - AE particles perhaps? Hmm....
Subscribe to:
Posts (Atom)